PARAMETER REFERENCE
Animation Settings
Create and clean up keyframes, deform outlines, add hand-drawn motion, and randomize selected elements.
Configures, deletes, and optimizes keyframes, applies randomization, and controls the hand-drawn animation and path deformation effects.
CAUTION
About setting keyframes on clips that have been split (cut) on the Edit page
If you set keyframes from this plugin (auto keyframe, viewer operations, WinAlt+KMacOption+K, etc.) on a clip that has been split on the Edit page, the keyframes are not placed at the correct positions. This is an issue caused by DaVinci Resolve's behavior, and the plugin cannot work around it. For this reason, we recommend not splitting the clip you apply this plugin to (see "Limitations" in the Appendix for details).
Auto Keyframe
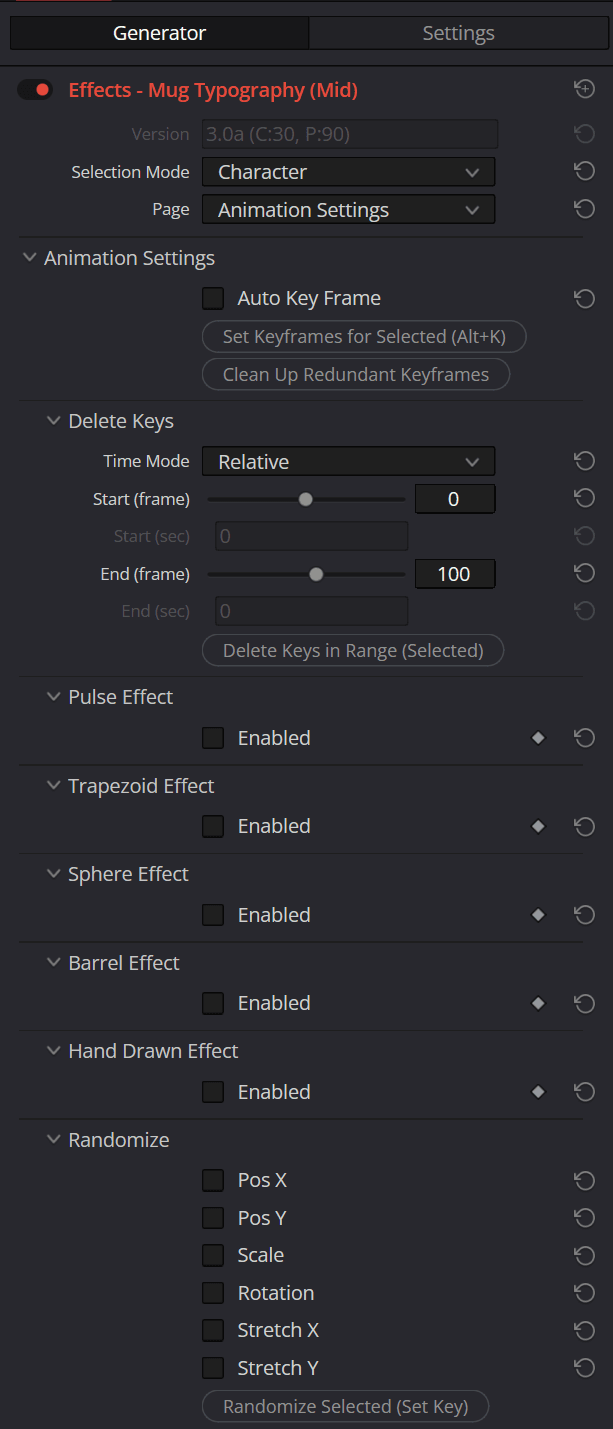
| Parameter | Description |
|---|---|
| Auto Key Frame | When turned ON, keyframes are automatically set whenever parameters are modified. |
NOTE
Since keyframes are recorded with every move or rotation, you may end up with a large number of unintended keyframes or unintended animations. Keep this OFF if you are not animating.
Manual Keyframe Setting
| Parameter | Description |
|---|---|
| Set Keyframes for Selected (Alt+K) | Records the values at the current frame as keyframes for the currently selected characters/parts. Does not modify parameter values. (Shortcut key WinAlt+KMacOption+K can also be used) |
NOTE
The recorded scope depends on Selection Mode. All animatable parameters within that scope receive keyframes.
- Global: All Global Settings parameters (Transform, Color, Gradient, Texture, Stroke, Blur, Shadow, Bounding Box, and so on; excludes individual characters, parts, the camera, and other pages)
- Character: All Character Settings for the selected characters, including Z Offset / Yaw / Pitch in 3D presets
- Part: All Part Settings for the selected parts, including Z Offset in 3D presets
Non-animatable switches such as Use Indiv Color are not recorded.
Clean Up Redundant Keyframes
This feature scans all animated parameters and removes unneeded keyframes whose values do not change (redundant keyframes). It provides standard and aggressive cleanup modes.
| Parameter | Description |
|---|---|
| Aggressive Cleanup | When OFF (default), standard cleanup is used. When ON, middle keyframes are also removed from runs of three or more consecutive keys with the same value. |
| Clean Up Redundant Keyframes | Opens a confirmation dialog, then scans all animated parameters using the selected mode and removes redundant keyframes. |
- Aggressive Cleanup: OFF (default) - Only parameters whose keyframes all have the same value are cleaned. All keys on such a parameter are removed and replaced with one static value.
- Aggressive Cleanup: ON - In addition to standard cleanup, when three or more consecutive keyframes have the same value, the middle keys are removed while the endpoints of the run are preserved.
CAUTION
An OFX plugin cannot inspect keyframe handles or interpolation curves. In aggressive mode, a same-valued middle key may still be important to the curve, but the plugin cannot detect that. Removing it may therefore change interpolation. Review the confirmation dialog and use this mode only when the host's Undo operation is available if needed.
NOTE
This is useful for cleaning up a large number of keyframes that may have been recorded unintentionally by "Auto Keyframe" during moves or transforms. This can help improve operation performance. The number of deleted keyframes will be notified in a dialog after completion.
Deleting Keyframes
Allows bulk deletion of keyframes within a specified time range.
| Parameter | Description | Default |
|---|---|---|
| Time Mode | Choose whether to specify the range using Relative (frames relative to the start of the clip at 0) or Absolute (timeline frame numbers). | Relative |
| Start (frame) | Start frame of the deletion range. | 0.0 |
| Start (sec) | Start time in seconds (read-only reference display). | 0.0 |
| End (frame) | End frame of the deletion range. | 100.0 |
| End (sec) | End time in seconds (read-only reference display). | 0.0 |
| Delete Keys in Range (Selected) | Deletes all keyframes within the specified range for the target scope determined by Selection Mode. | - |
WARNING
Deletion scope when Selection Mode is Global When Selection Mode is Character or Part, only keyframes on the currently selected characters or parts are deleted. However, when Selection Mode is Global, clicking Delete Keys in Range (Selected) deletes all keyframes within the specified range across every parameter in the plugin - including Global Settings, individual characters and parts, the camera, deformation effects, and script inputs.
Path Deformation Effects
In addition to the Hand Drawn effect, four deformation effects are available to distort character outlines in a regular, consistent way. Turning Enabled ON for any of these effects reveals its parameters and applies the corresponding deformation and animation.
1. Pulse Effect
Expands and contracts the character outline outward and inward, creating a breathing-like motion.
2. Trapezoid Effect
Warps text into a trapezoid shape (perspective distortion) along a custom angle axis. By shifting the angle, you can modify the taper direction. Animating this parameter allows you to warp characters back and forth.
3. Sphere Effect
Projects the character outline onto a sphere, inflating (ballooning) or pinching it at the center.
4. Barrel Effect
Gradually changes the scale from the character's center toward the outside, creating a barrel (bulging) or pincushion distortion.
Common Deformation Parameters
| Parameter | Description | Default |
|---|---|---|
| Enabled | Enables the deformation effect and displays the parameters below. Animatable. | OFF |
| Amplitude | Specifies the strength (amplitude) of the distortion: · Pulse: Amount the outline expands/contracts outward and inward. · Trapezoid: Taper strength (1.0 pinches one end completely). · Sphere: Strength of the spherical bulge (1.0 = fully spherical). · Barrel: Strength of the central (barrel) bulge (1.0 doubles the size at the outer edges). ※ For Sphere / Barrel, the slider display range is 0.0-1.0, but direct input accepts -10.0-10.0. Pulse displays 0.0-3.0, but direct input accepts 0.0-20.0. | Pulse: 1.0Trapezoid: 0.3Sphere: 0.5Barrel: 0.5 |
| Range Min *Except Trapezoid | Specifies the lower bound of the deformation swing (-1.0 to 1.0). Setting this to 0.0 restricts the deformation to expansion only (or contraction only). | -1.0 |
| Range Max *Except Trapezoid | Specifies the upper bound of the deformation swing (-1.0 to 1.0). Setting this to 0.0 restricts the deformation to contraction only (or expansion only). | 1.0 |
| Speed (Hz) | Specifies the speed of animation in Hertz (cycles per second). | 2.0 |
| Angle *Trapezoid only | Specifies the angle axis for the trapezoid taper direction. | 0° |
| Step | Specifies the discretization step size for phase animation (in degrees). Set to 0.0 for smooth motion; set to 360.0 to freeze animation entirely. | 0.0 |
| Phase | Specifies the global initial phase offset (in degrees). | 0° |
| Char Phase | Specifies the phase offset increment per character index (in degrees). Setting this value creates a wave-like propagation effect from left to right (or right to left). | 0° |
| Char Delay | Specifies the delay time offset per character index (in seconds). Used to offset the start timing of animations across characters. | 0.0 |
| Targets | Specifies the characters/parts to apply the effect to. For the notation, see "Targets Format" (character unit c1 / part unit p5 / range c1-c3 / negation !c2, etc. are available).If empty, the effect is applied to all parts. Useful for distorting only specific characters, or for using negation (e.g. !c1) to exclude certain characters/parts (such as diacritical marks) from the deformation. | (empty) |
Hand Drawn Effect
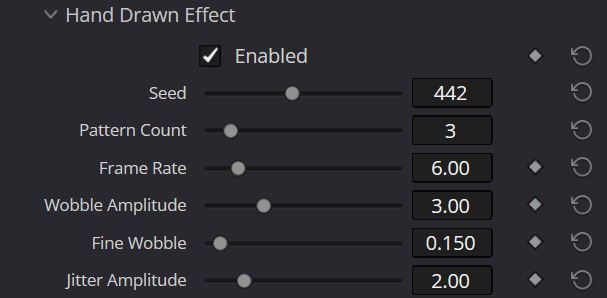
Adds an organic, hand-drawn animation to the text by combining two effects: wobble, which distorts the outline paths of characters in a wave-like fashion, and jitter, which subtly shifts the position, rotation, and scale of each character frame by frame.
| Parameter | Description | Default |
|---|---|---|
| Enabled | Turns the effect on or off and displays the parameters below. Animatable. | OFF |
| Pattern Count | Number of frames in the loop cycle - think of it like the number of cels in a flip-book animation. The effect cycles through this many distinct patterns before repeating. Not animatable. | 3 |
| Wobble Amplitude | Strength of the path distortion (wobble). 0 disables wobble. Animatable. | 3.0 |
| Fine Wobble | Strength of the micro hand tremor (local wobble). 0 disables tremor. Animatable. | 0.15 |
| Jitter Amplitude | Strength of the character position displacement (jitter). 0 disables jitter. Animatable. | 2.0 |
| Frame Rate | How many times per second the pattern switches. Lower values produce slower, smoother changes. Animatable. | 6.0 |
| Seed | Seed value that determines the random wobble/jitter pattern. Different seeds produce different patterns. Not animatable. | 0 |
| Targets | Specifies the characters/parts to apply the effect to. For the notation, see "Targets Format" (character unit c1 / part unit p5 / range c1-c3 / negation !c2, etc. are available). If empty, the effect is applied to all parts. | (empty) |
TIP
Tips for getting the most out of this effect
- Simply turning Enabled ON gives you a natural hand-drawn wobble with the default values.
- If the wobble feels too strong, lower Wobble Amplitude (outline ripple) and Jitter Amplitude (positional offset).
- Adjust the speed of the wobble with Frame Rate. Lower values produce slower movement.
- Setting Pattern Count to
1freezes the wobble into a static (non-moving) hand-drawn look - handy when you want the texture without any motion.
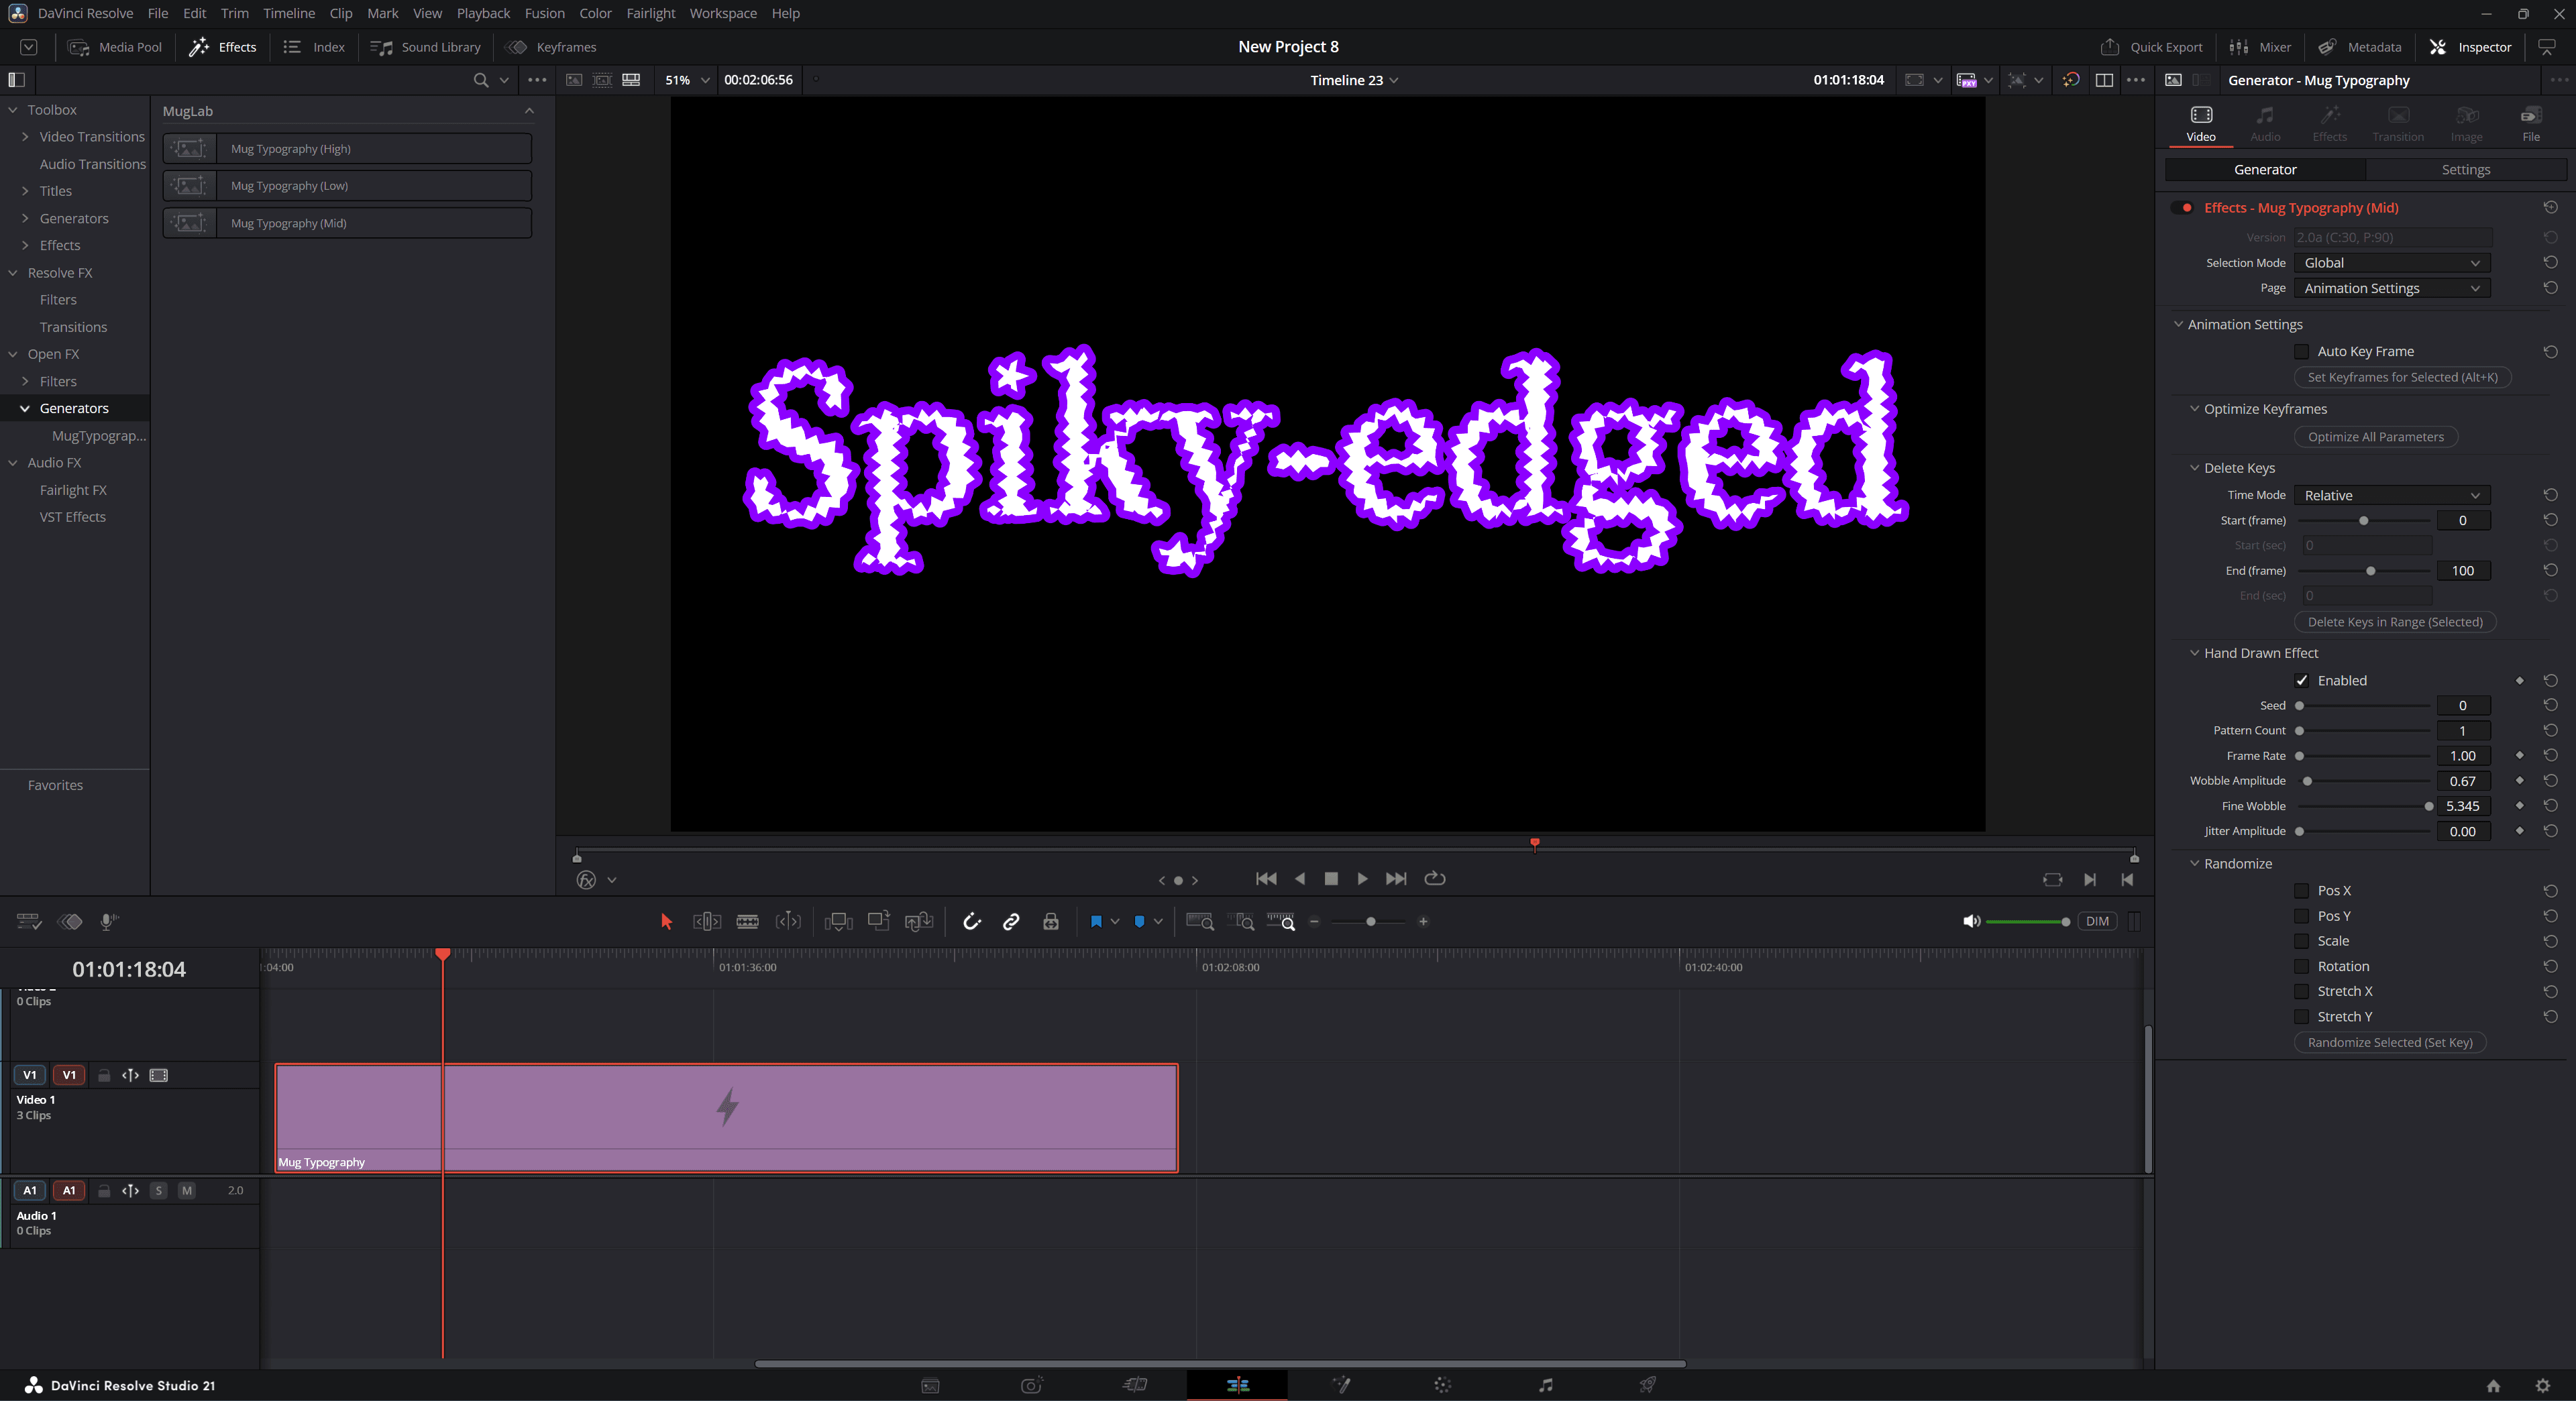 Example of a jagged, spiky look
Randomize
Simultaneously applies and keyframes random values within the specified range for selected characters/parts. Useful for quickly creating initial animation states.
| Parameter | Description | Default Range |
|---|---|---|
| Pos X | Randomize X position (turn ON to display Min / Max) | 0.4 to 0.6 |
| Pos Y | Randomize Y position (turn ON to display Min / Max) | 0.4 to 0.6 |
| Scale | Randomize Scale (turn ON to display Min / Max) | 0.7 to 1.3 |
| Rotation | Randomize Rotation (turn ON to display Min / Max) | -30° to +30° |
| Stretch X | Randomize X Stretch (turn ON to display Min / Max; effective in 2D presets only) | 0.8 to 1.2 |
| Stretch Y | Randomize Y Stretch (turn ON to display Min / Max; effective in 2D presets only) | 0.8 to 1.2 |
| Randomize Selected (Set Key) | Applies the checked items to the selected characters/parts and records keyframes (works only when Selection Mode is Character or Part). | - |
NOTE
The values specified in Min / Max are absolute. They are not offsets to the current values, but the absolute values to be set directly.
Randomization Procedure:
- Turn ON the checkbox for the parameters you want to randomize (
Min/Maxwill appear). - Set the
Min/Maxvalues. - Select the target characters or parts in the viewer (set
Selection ModetoCharacterorPart). - Press the Randomize Selected (Set Key) button.
ReferenceShow the full Inspector on this page