LUA SCRIPTING NEW
Animate text with scripts
Waves, random scatter, physics-like motion - build animations that are hard to keyframe with just a few lines of script. The bundled VSCode extension lets you develop and preview without launching DaVinci Resolve.
- Per-frame control in code
- VSCode simulator included
- Rich sample script library
How to Use
In the conventional 2D, 3D, and Lite presets, enable scripting as follows:
- Set Page to
Scripting. - Turn Script Enabled on.
- Enter a Lua script into Script Text, or use Paste Script to paste it from the clipboard.
In the Mug Typography Scripting preset, the Scripting group appears directly on the Global Settings page, so no page switch is required. This preset omits Character Settings and Part Settings, supports up to 512 characters and 1,024 parts, and controls individual characters and parts from Lua. Use a conventional preset when you want to combine individual Inspector editing with Lua.
For example, this script alone keeps every character swaying with a per-character phase offset (because 0.5 is the neutral position for offset_x and offset_y, add your offset to the existing value):
function OnLayout(ctx)
    for index, character in mt.each_char(ctx) do
        character.rotation = character.rotation + math.sin(ctx.time * 2.0 + index * 0.4) * 15.0
        character.offset_y = character.offset_y + math.sin(ctx.time * 3.0 + index * 0.7) * 0.02
    end
end
The script overrides the Inspector values every frame, so it combines freely with keyframes and other features such as deformers, Write On, and 3D.
For static layouts or decoration that do not depend on time, -- @time_independent lets the plugin skip Lua execution and text rendering on unchanged frames. Do not add it to the example above, which animates with ctx.time. See Time Independence and Render Reuse for the conditions and a static example.
The Three Callbacks
A script can define up to three functions. Only define the ones you need.
| Callback | Timing | Typical use |
|---|---|---|
OnPreLayout(ctx) | Before layout, every frame | Change text, tracking, alignment, global colors, or camera settings, and declare shapes or custom glyphs |
OnLayout(ctx) | After layout, every frame | Adjust position, rotation, scale, and colors per character, part, and shape |
OnPath(ctx) | After OnLayout, every frame | Replace selected part or shape outlines through ctx.paths with custom paths |
Each frame runs in two main steps: OnPreLayout sets up the text and layout settings, and OnLayout animates the characters and parts generated from that layout. Anything that changes the character count or line breaks (such as a typewriter reveal) goes in OnPreLayout, while per-character or per-part motion goes in OnLayout.
The mt.* namespace provides target iterators (mt.each_char / mt.each_part), math helpers (mt.clamp / mt.lerp / mt.remap), easing (mt.ease.*), color conversion (mt.color.*), timeline scheduling (mt.timeline.*), and reusable SVG path builders (mt.svg_path).
Drawing Shapes and Custom Glyphs
Beyond animating text, scripts can draw custom vector shapes and SVG paths. Three APIs cover different use cases:
| Method | Overview and typical use |
|---|---|
Shapes (ctx.shapes) | Standalone vector layers placed independently of text layout. They do not count toward character or part limits and can be drawn behind (layer = "back") or in front of (layer = "front") the text for backdrops, frames, decorative borders, particles, or animated backgrounds. Shapes also support parent-child hierarchies (parent) and their own 3D cameras (ctx.shape_cameras) separate from the text camera. |
Custom glyphs (ctx.glyphs) | Declares a custom path with advance metrics (advance_x / advance_y) and returns a placeholder character that flows inline with ctx.global.text. Ideal for inline icons, list markers, table grid lines, and connectors. |
Outline replacement (ctx.paths) | Replaces or edits the outline (path) of existing character parts in OnPath when you want specific characters or parts to take on a custom shape. |
Paths can be built from SVG path strings with mt.svg_path or constructed procedurally with lines and Bézier curves via mt.drawing_path. See the API Reference for details.
The VSCode Simulator (MT Sim)
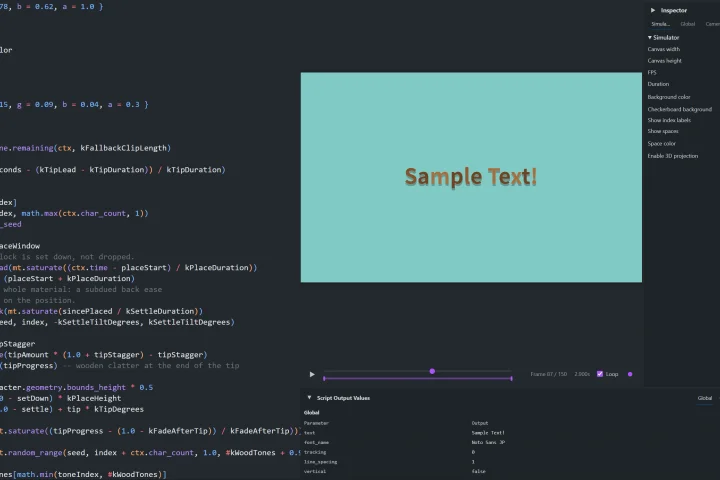
The distribution ZIP includes the VSCode extension Mug Typography Scripting Simulator (MT Sim) in the scripting-simulator/ folder. It lets you write and preview scripts directly in VSCode without launching DaVinci Resolve.
- Install: In the VSCode Extensions view, choose "Install from VSIX..." and select the bundled
.vsixfile. - Launch: Open a
.luafile and run Mug Typography Scripting Simulator from the preview icon in the editor title bar or from the Command Palette. Saving the file reloads the preview immediately. - Copy to the plugin: Click Copy Script in the top toolbar, then click Paste Script in the plugin to paste into Script Text.
- Editing support: Autocompletion and hover docs for
ctx.*andmt.*, filtered so each callback only suggests fields that are writable in that phase. - Scene reproduction: Timeline playback, font selection, per-character and per-part inspectors, an evaluated-values view, and an interactive 3D camera preview.
NOTE
API level and plugin compatibility To use every feature, use the latest plugin. Samples and scripts that use newer APIs do not run on an older plugin. The current plugin is API Level 15.
Use the VSCode extension together with the plugin from the same distribution ZIP.
The online simulator supports the latest API, so it shows a notice asking you to update the plugin, and keeps showing it until you confirm that you have.
WARNING
The simulator is an approximate preview MT Sim approximates the plugin's layout and rendering. Gradient interpolation, projected stroke quality, and similar details are simplified, so always verify the final result in Mug Typography itself.
Try it in your browser
No installation required: an online simulator ↗ is also available directly in your browser. It offers the same editing support and sample collection as the VSCode extension, making it a convenient way to try things out or learn the API.
Publishing your work to the gallery
Animations you make can be published to the online simulator's gallery. Published work appears under the sample browser's Community section, where anyone can open a card to read the script or use it as a starting point for their own.
Submissions are taken on the gallery repository ↗, which Submit to Gallery in the simulator's menu also opens. Its README covers what to attach and how.
Having an AI Write the Script
You do not need to know Lua - describe the motion you want to an AI assistant and it can generate the script for you. There are two ways depending on your setup:
- Option A: Use Mug Typography MCP (Recommended) - If you use Claude Desktop, Codex, Cursor, VS Code, Gemini CLI, or Antigravity, install Mug Typography MCP so the AI can look up the specification on its own and automatically verify the script it writes (no manual file attachment needed).
- Option B: Give a chat AI the reference file - If you use a browser-based chat assistant such as ChatGPT or Claude without MCP, give it the AI-oriented API reference (
lua_api_for_ai.md) first following the steps below. Skip that step and you will get scripts that call functions which do not exist, or that get units and directions wrong.
Steps for Chat AI
Load the reference. Start a new chat, attach the file below from the distribution ZIP, and ask the assistant to read it.
textscripting-simulator/docs/lua_api_for_ai.mdIf your assistant cannot take attachments, open the file in a text editor and paste its full contents instead. Assistants that can fetch web pages can be given the URL below, though many cannot, so attaching is the safer default.
texthttps://mug-typography.muglab3.com/lua_api_for_ai.mdCheck that it was read. The reference is a large file, and some assistants quietly skip large attachments. Ask this next:
What are the arguments of
mt.stagger, including their units?If the answer is
time(seconds),index(1-based),delay(seconds) andduration(seconds), the reference was read correctly. If not, see If it does not work.Describe the animation you want. The more specific you are, the closer the result will be.
Make the letters bounce up one by one from below, then have the whole line sway gently once they have all appeared.
For an effect that will never use 3D controls, explicitly ask for a 2D-only script or say limit it to 2D. A compatible assistant will add the script setting (
-- @2d) that selects the 2D rendering path even in the 3D-capable Scripting preset. Skipping 3D projection can improve rendering speed, but it also disables every 3D Inspector setting and keyframe, including Camera and Global 3D controls. Do not request 2D-only output if you may add 3D motion later.Copy the returned code into Script Text, or load it with Paste Script.
If the motion is not what you wanted, just say so. You can keep refining with follow-ups like "make the bounce stronger" or "drop the swaying". In the online simulator, opening AI Preview Image… from the menu lets you copy or save a multi-frame PNG sheet across the marked playback range (or the whole clip) and attach it to the chat so the assistant can visually inspect the animation.
If it does not work
A failed check in step 2, calls to functions that do not exist, units or directions that are clearly wrong - all mean the reference was not read. Try these in order.
- Start a new chat and attach it again. Long conversations drift away from what was attached first; asking right after loading the reference is the most reliable.
- Paste the full text instead of attaching it. Open the reference in a text editor, select all, and paste it into the chat. This is read more reliably than an attachment.
- Try a different assistant. Small models running on your own machine often cannot take a reference this large.
TIP
Use the simulator to check the result Paste the script into MT Sim or the online simulator to view and copy error messages with line numbers, which you can hand straight back to the assistant to have it fixed.
Samples and API Reference
The distribution ZIP ships many ready-to-use Lua samples in scripting-simulator/samples/:
reference/- short, topic-grouped lessons for the scripting model and individual APIsshowcase/- finished animations: typewriter, bounce-in, neon glow, background and shape scenes, 3D camera moves, and morediagnostics/- internal scripts for verifying the environment and API behavior
reference/ is organized into genres so you can look up APIs by topic: Basics and callbacks (RBS), Time and animation (RTM), Text and layout (RLY), Color and appearance (RAP), Paths, custom glyphs, and shapes (RPT), Random and noise (RRN), and 3D and camera (RCM).
In the simulator's Sample Browser, you can browse by genre or search by sample ID, keyword, and API name:
- Play preview: Previews a sample's animation right inside the browser without overwriting the script or scene you are currently editing.
- Open in editor: Loads the selected sample into the editor so you can inspect or customize it.
- Scripting Check: Available in the menu to run a quick diagnostic without modifying your current script or scene.
For the complete specification, see the Lua Scripting API Reference. The same reference is also included for offline use under scripting-simulator/docs/ in the distribution ZIP.
For parameter details and limitations, see Scripting Settings.