Core Concepts
This plugin has three levels that you can work with.
| Level | Description | Example |
|---|---|---|
| Global | Settings applied to the entire text at once | Font, overall position, rotation, and scale |
| Character | Settings that can be applied individually to each character | Enlarge a specific character or change its color |
| Part | Settings for each part of a character (separate pieces such as dots, diacritics, and kanji components) | Move only the diacritic marks in a character |
For example, you can move the entire text to the right globally, shift only a specific character farther upward, and rotate only a particular part within that character.
How Transformations Accumulate
Transformations at each level accumulate in the order Global → Character → Part, and the result is rendered.
- Sun = Global (entire text)
- Earth = Character (each character)
- Moon = Part (each part)
The Earth orbits the Sun, and the Moon orbits the Earth. Just as the Moon's position relative to the Sun depends on both orbits, Global, Character, and Part transforms are applied one after another around each level's pivot. Rotation angles add up directly, whereas the final position depends on where each pivot sits.
Transformations accumulating in the order Global → Character → Part
Color overrides follow the same Global → Character → Part order. See "Color Priority" in the appendix for details.
When Part Controls Are Not Needed
If you don't need to move or style individual parts, pick a Lite preset. Omitting Part Settings keeps the Inspector much smaller, so clips load and switch noticeably faster.
See "Getting Started" for help choosing the right preset.
Translucent Text
Mug Typography draws each character as parts, one per contour. Some fonts build a single character from several contours that overlap: where two strokes cross, for example, each stroke's outline simply runs over the other (common in variable fonts and some Japanese fonts). Such a character is drawn with its parts overlapping.
While the text is opaque, the overlaps do not show. Once a fade or a lower opacity makes the text translucent, the overlapping areas receive the color twice and look more opaque than the rest, so they stand out. The stroke also follows each part's outline, so a line appears where the parts overlap inside the character. Either can give a look you did not intend.
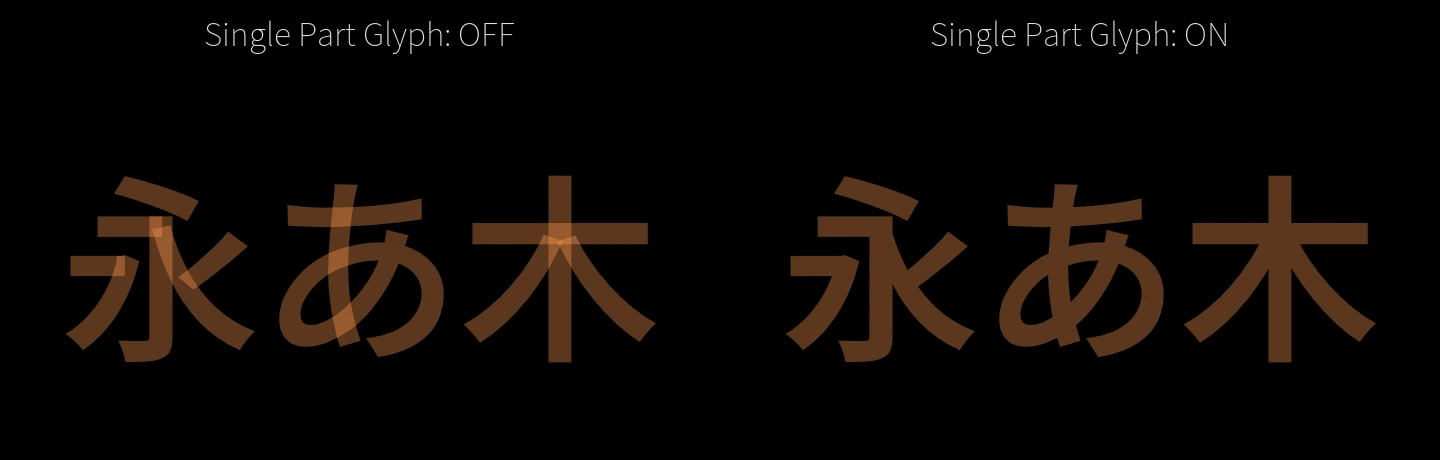
Turning Single Part Glyph ON draws each character as one part, so the overlaps no longer stand out and no line appears inside.
- Turn it ON for fades, opacity changes and other translucent text when parts are not moved individually.
- Keep it OFF to move the pieces of a character separately, such as only the dot of a letter (Part Settings, part-unit Write On, Morph). ON makes each character a single part that cannot be split into its pieces (color emoji and custom glyphs declared from scripts are unaffected by Single Part Glyph).
The Lite presets assume parts are not controlled individually, so it is ON by default there. If part of a character stands out when the text is translucent, check this setting.
When Controlling Individual Elements from Scripts
The Scripting preset removes Character Settings and Part Settings from the Inspector so you can drive individual characters and parts from Lua instead. Global and Camera settings stay available in the Inspector, and the preset handles up to 512 characters and 1,024 parts. Standard presets also run Lua scripts, so choose a standard preset when you want to mix per-character Inspector edits with a script.
See "Animate with Lua Scripts" for details.
Understanding the Indices
Character 1, 2... in Character Settings counts characters from the start of the text. Part Setting 1, 2... in Part Settings counts parts continuously across all characters. These numbers match the c1 and p1 targets used in Output Settings and Animation Settings.
TIP
Each Inspector group header also shows the character itself and which part of that character it controls. If you aren't sure which number corresponds to which element, click the character or part in the viewer to select it.